· Jack Young · Education · 13 min read
Unit 18 (P3, P4, P5, P6, M2, M3, M4): Creating a Relational Database
Creating a Relational Database in Microsoft Access.
Create and Populate a Database
Create and populate a database (P3)
I created a new desktop database with the name ‘ITSupport.accdb’
I created each table and populated it within the database. Each table that I created followed my design that I did before creating the database. The table name, field name, data type and field size has been correctly inputted.
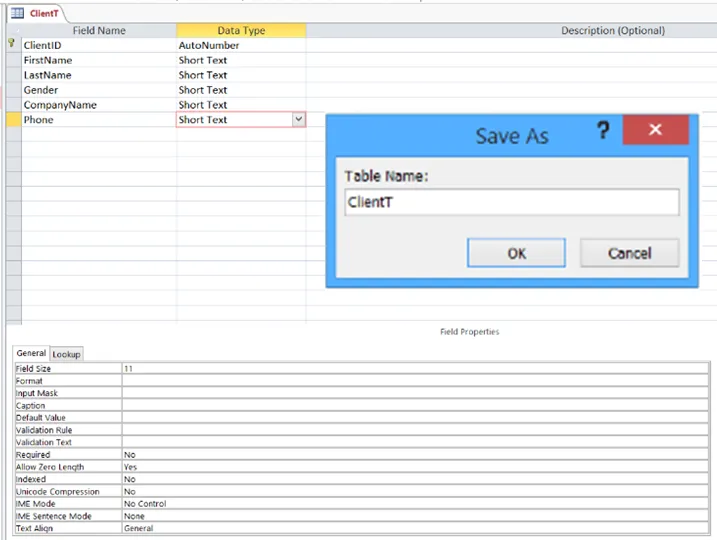
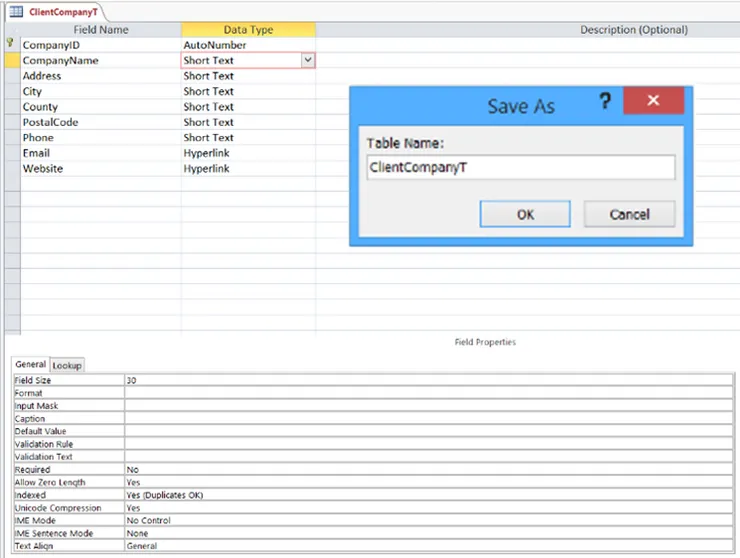
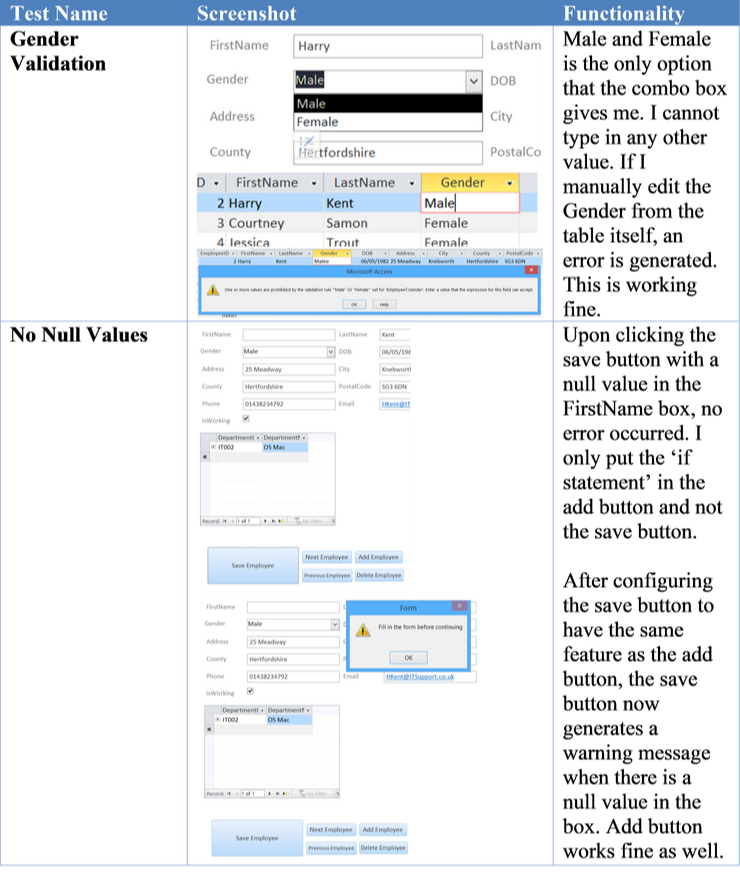
Below shows that I have correctly inputted the validation rule for gender that I specified in my design.
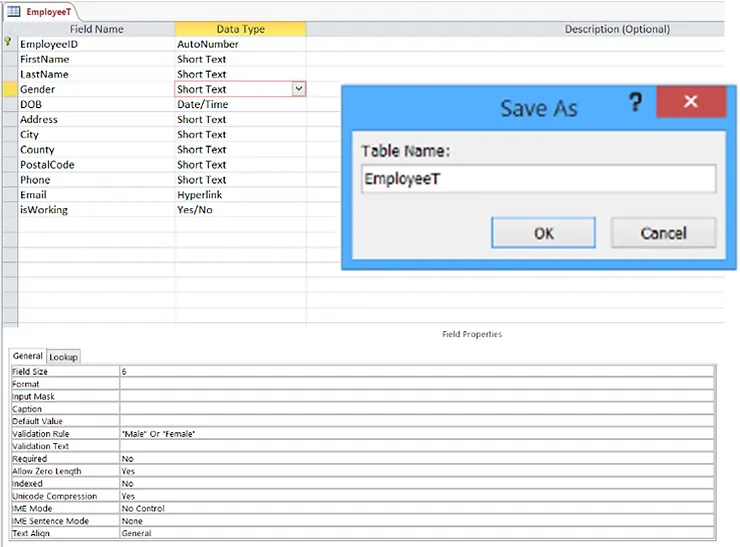
If I do not put ‘Male’ or ‘Female’ value in the field then it will come up with this message:

I put >“IT000” as the validation rule for the ‘DepartmentCode’ as I want all values to start with ‘IT’ and end with 3 numbers after that.
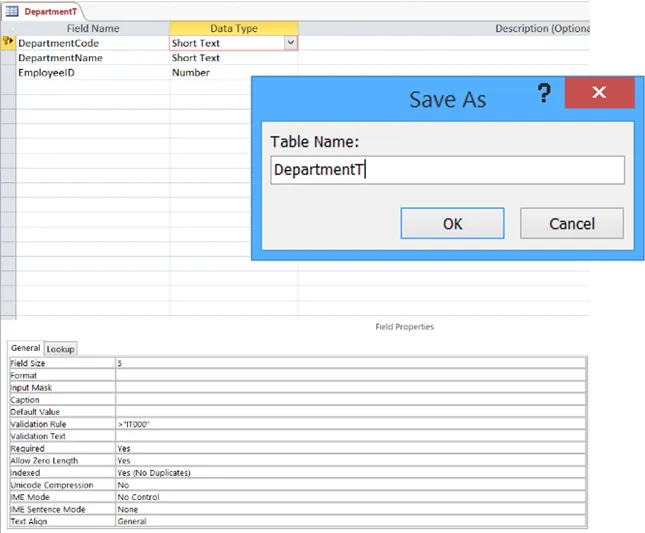
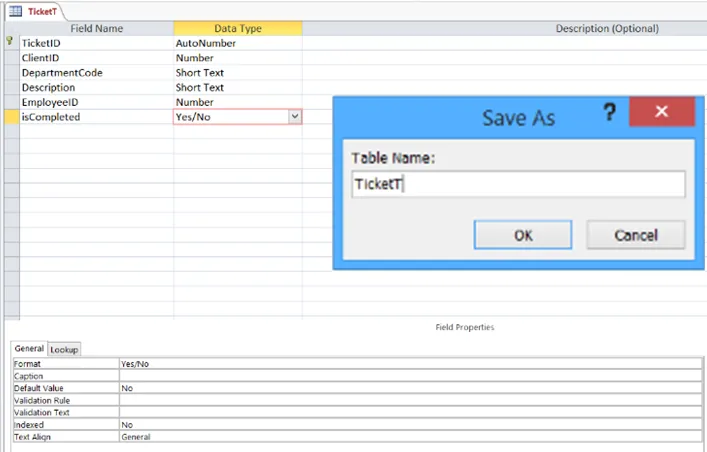
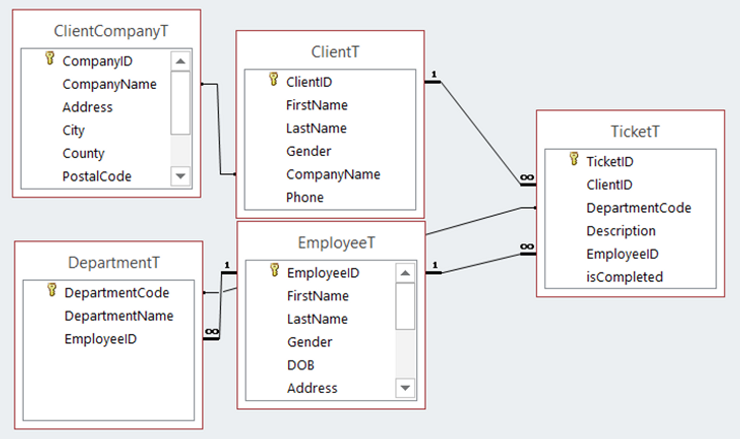
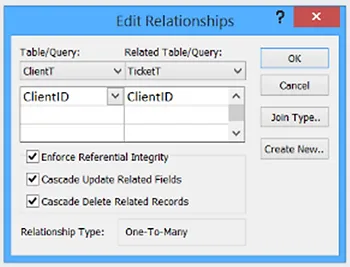
After I created the tables in the database, I then would need to make relationships with them as described in my design. This is an example of one of the relationships (This one has been referential integrity enforced and has cascade update and delete options ticked):
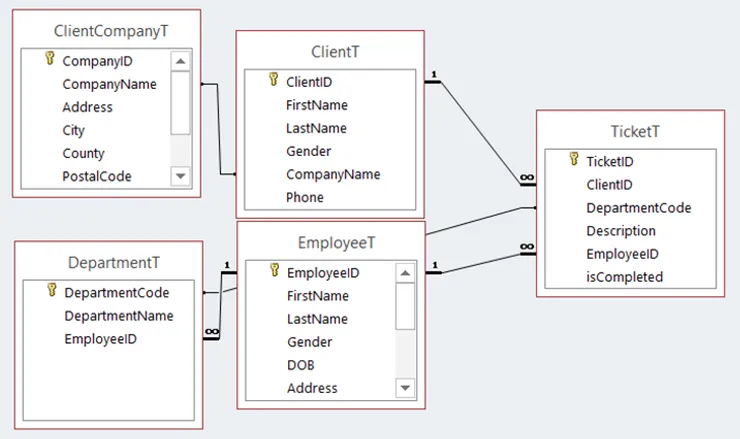
This is an overview of all the relationships:
Creating Features in Data Entry Forms
Create features in data entry forms to ensure validity and integrity of data (P4)
Forms allow users to easily manage data in the database without directly messing with the database itself. Sometimes you do not want employees in your company to edit the database manually, thus, making forms will reduce the complexity and the chance that the database produce errors.
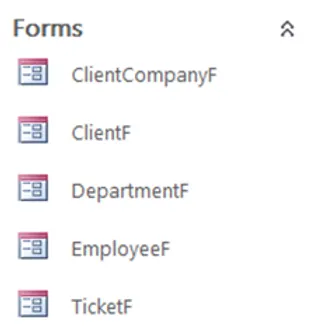
Each table will have a form to easily manage the data in it. I already designed the forms for each table and now I am going to create the forms in the database. To do this, I clicked on the create tab at the top of the database then I clicked on form.

From here, a form is automatically created, but it is different to my initial design. This means that I would need to change it so it matches my initial design idea:
Old
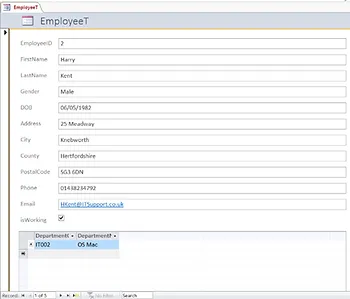
New
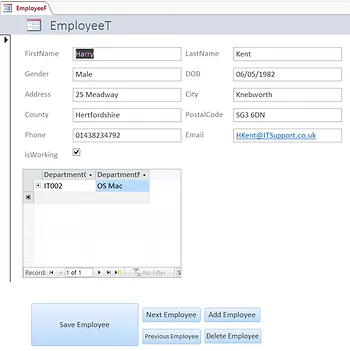
The buttons below the form are added to give it extra simplicity to the design and easy use for any user who is adding/removing information in the database.
To ensure integrity of the database and to make sure that the data is accurate, I added in combo boxes to the form which only allows the user to enter a certain value such as ‘Male’ or ‘Female’:
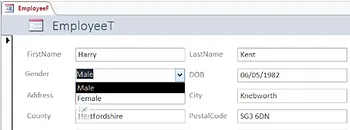
This insures that no other value apart from the values in the combo box is entered which means that the database will not produce errors as the values will be correct and accurate.
In addition to this, I also set the DateCreated field in the TicketT table to automatically input the current date to pre-populate new tickets:

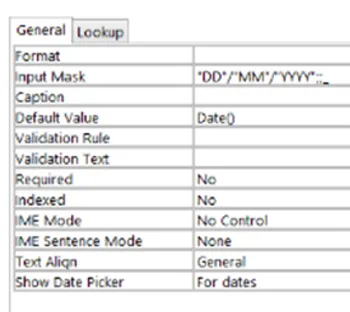
I did this by making an input mask to
"DD"/"MM"/"YYYY";;_
which automatically sets the date in this format (I also did this with the ‘DateCompleted’ field too). I then set the default value of ‘Date()’ which means that the current date will be placed into this field when a new ticket is created. This insures the accuracy of the data inputted into the table as you can only input data in a certain format.
Database Queries
Perform queries using multiple tables and multiple criteria (P5)
Queries allow you to filter your database for a specific need. If you want to find something, then a query would be the best way to get to the information you are looking for.
To make a query; you click on the create tab at the top of the document and then click Query Design to create a query from scratch. Add the tables you need from the show table menu into the query. You can then define the criteria of your query in the section at the bottom of the document.
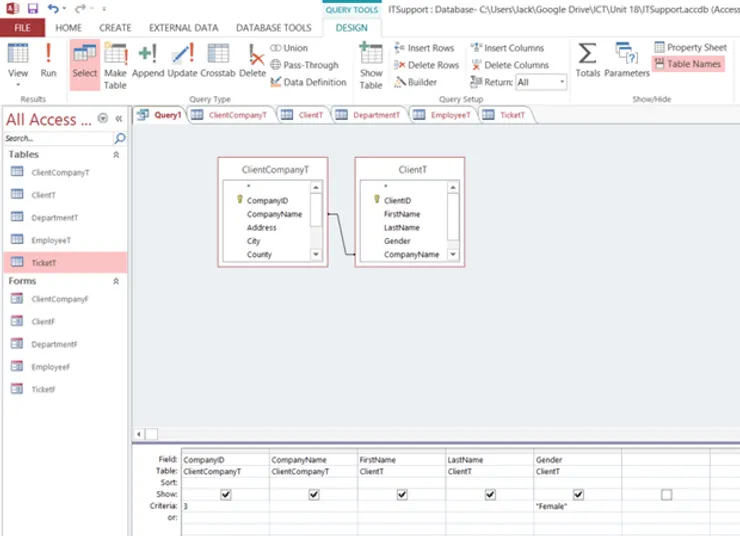
Query 1
All female clients who work for the company IT4U (ID of 3).

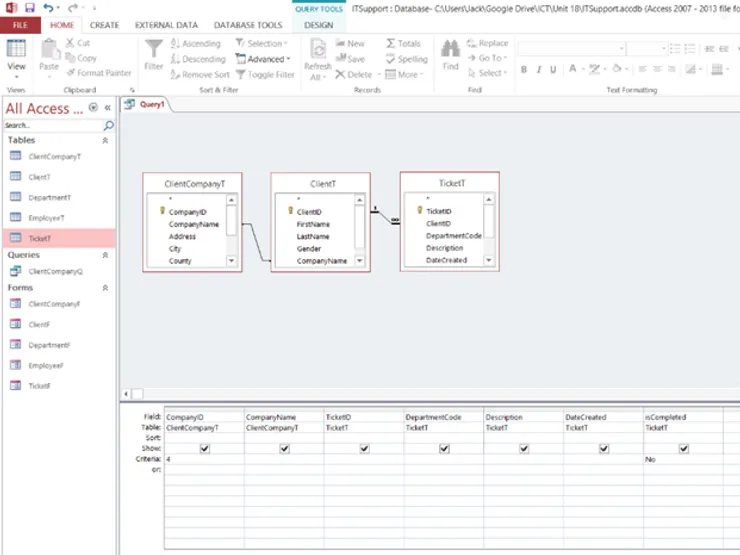
Query 2
All tickets that have been made by the company PCFixer (ID of 4) that still needs completion.

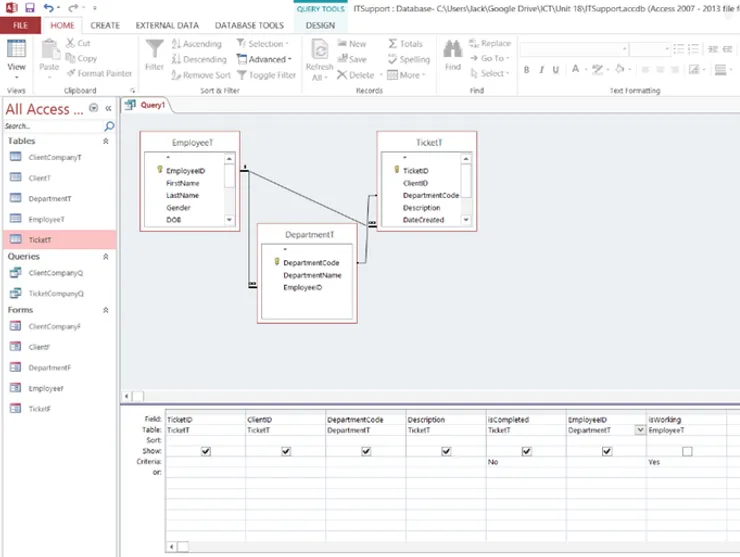
Query 3
All tickets that is not completed, however, there is an employee currently working that specialises in the department where the ticket needs help in. For example, if a client needs help with an internet issue and an employee who specialises in internet issues is currently in working hours, then that ticket will show up in the query.

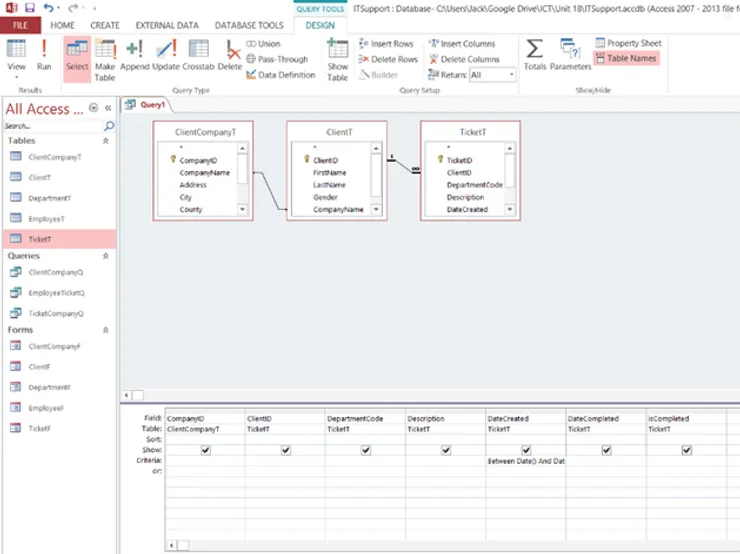
Query 4
All tickets that has been created in the past 5 days including the date today. As of writing this query; the current date is 09/05/2015 so this would include all dates within 05/05/2015 – 09/05/2015 using this criteria ‘Between Date() And Date()-4’.

Advance Features
Include an advanced feature in a database design (P6)
Going back to my form, there are still areas in which I can improve using advanced features in the database.
The first thing I can do is to make a macro that if a value in the form returns null, then send a warning message saying ‘Fill in form to continue’ which then stops it from adding it to database.
To do this, I first need to be in design view of a form (I will be using ‘EmployeeF’) so I can edit the form. Then I right-clicked on the ‘Add Employee’ button in the form and clicked ‘Build-Event…’ then ‘Macro Builder’. This brings up a plus sign and a box that I can type in.
In the box, I typed ‘If’ so I can make an if statement with the following code:
IsNull([FirstName]) Or IsNull([LastName]) Or IsNull([Gender]) Or IsNull([DOB]) Or IsNull([Address]) Or IsNull([City]) Or IsNull([County]) Or IsNull([PostalCode]) Or IsNull([Phone]) Or IsNull([Email])
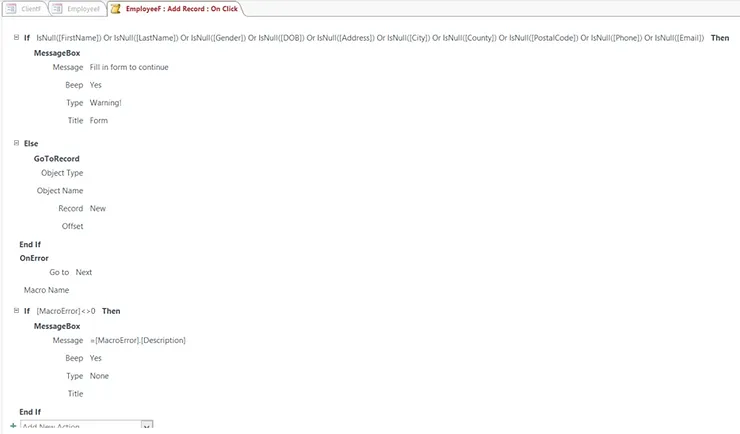
This simply states that if one of the values in the form such as FirstName, County etc. returns null, then do something. What I want the macro to do is send a warning message box when this occurs. The message box is as follows:
MessageBox
 Message: Fill in form to continue
 Beep: Yes
 Type: Warning!
 Title: Form
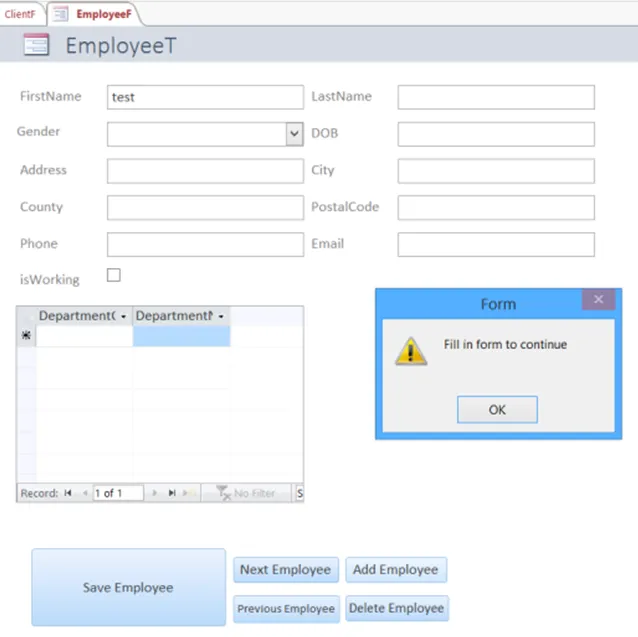
This will make a message box with the message ‘Fill in form to continue’ on the screen. However, even when the message box appears it will still let add it to database. What I need to do is create an else statement to stop this from happening. The else statement consist of actually adding whatever is in the form to the database, but because I have an if statement before this saying no null values, then the add button will only add the form to database if there is no null values. The else statement is as follows:
Else
 GoToRecord
  Object Type:
  Object Name:
  Record: New
  Offset
Now, if there are any null values in the database, a message box will appear and the form will not be added.
The second thing I can do to make this form even easier to use and input data into, I am going to use an advance feature called a combo box.
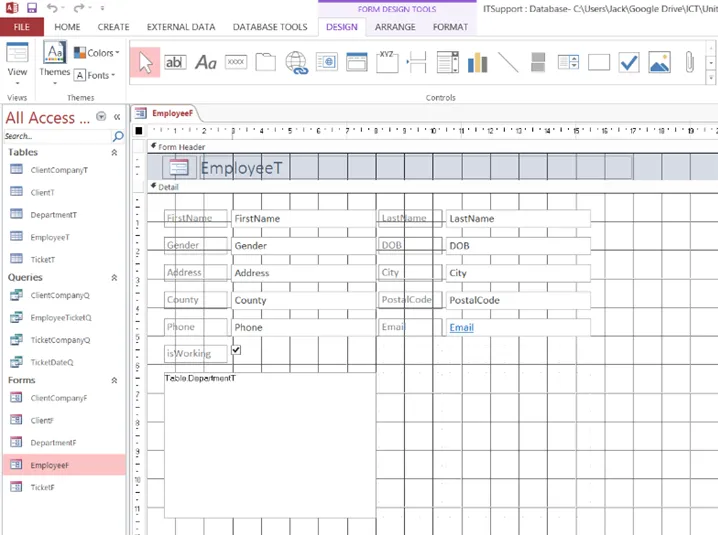
This combo box will allow users to not input incorrect information into the database and will force users to use only certain values specified by the database. In this example, I am going to add a combo box to the gender entry box so it only allows you to select ‘Male’ or ‘Female’. As it is right now, I can input any value into this box like ‘Maleeee’ and it would create an error because I already specified in the validation rule to only use Male or Female values. This combo box will remove this error and make it easy for the user to input information.
First, I select combo box from the design tab:

Secondly, I select ‘I will type in the values that I want’ and click next.
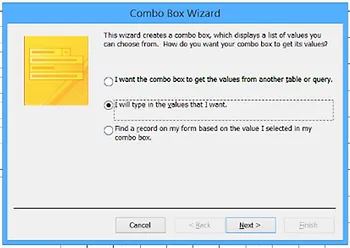
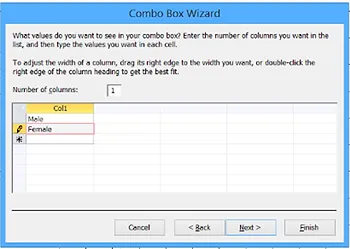
After this, I type in two values ‘Male’ and ‘Female’ in each individual record in the same field.
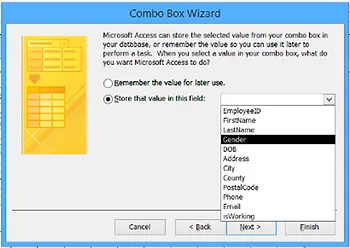
Next, I selected ‘Store that value in this field’ and then select ‘Gender’ from the combo box.
Then, I typed in a name for the combo box, in my case, I named it ‘Gender’.

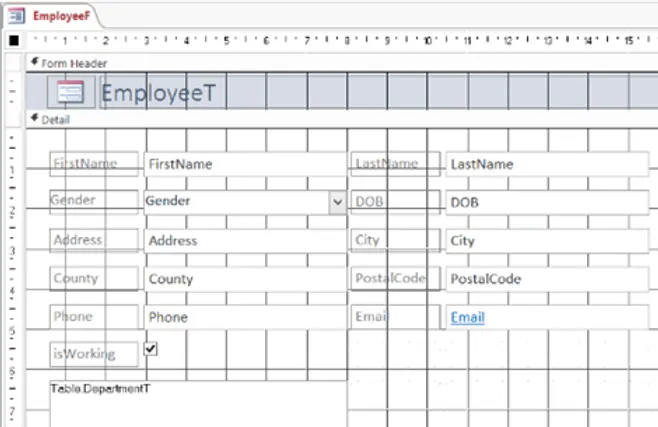
I then replaced my old box with the new combo box that I had created simply by dragging and dropping. Now the form is complete and you can only put in two values ‘Male’ or ‘Female’.
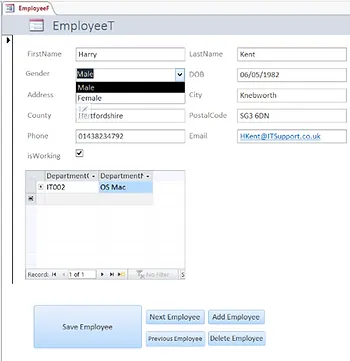
I did this with the other forms as well such as the ‘ClientF’ form.

However, there is also an opportunity for error when typing in the ‘CompanyName’. The user would need to know what company we have in the database, but the user can mistype or not capitalise where necessary. I want the user to easily know what companies are in the database and if the database gets a new company, I want the combo box to automatically detect and add that to the company name list without having to manually add the name.
Firstly, I select combo box from the design tab just like before but this time, I select ‘I want the combo box to get the values from another table or query’.
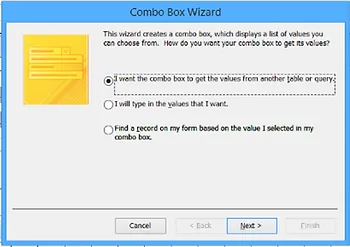
I then select the ‘ClientCompanyT’ table where all the company information is kept about our clients.
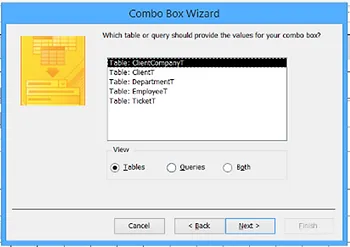
From here, I select ‘CompanyName’ and move it over to the right side so it is selected.
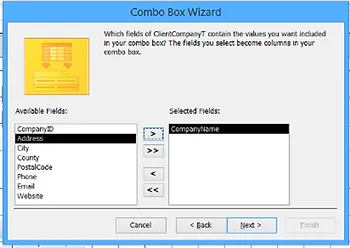
I will then select ‘CompanyName’ from the combo box and put it as ascending so the ‘CompanyName’ will go in alphabetical order starting from a-z.
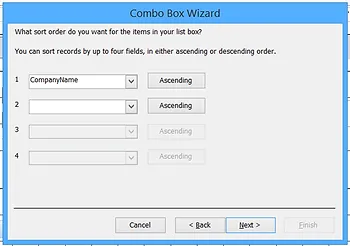
I then tick ‘Hide key column’ as I only want the ‘CompanyName’ to show up in the combo box.
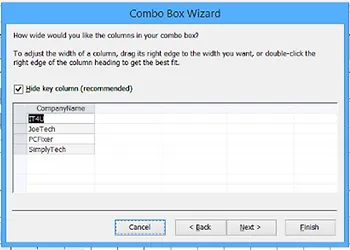
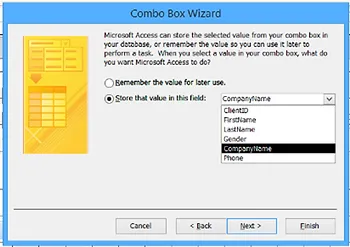
I then select ‘Store that value in this field’ then I selected ‘CompanyName’ from the combo box and clicked next. I named the combo box ‘CompanyName’ and clicked finish.
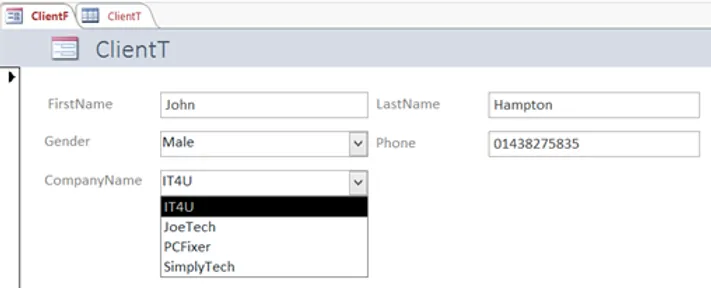
I replaced the combo box with the old ‘CompanyName’ box and now I can select the ‘CompanyName’ that is associated with each client. The ‘CompanyName’ will update if I change the ‘ClientCompanyT’ table by adding or removing a company and it will also update the combo box in this form respectively.
Clicking on the next client or previous client button is a bit tedious to do. I want the user who is using the form to easily navigate to a specified client in a database without having to click next every time. For big companies that have lots of client, this would be helpful.

To do this, I firstly need to make another combo box, but this time, select ‘Find a record on my form based on the value I selected in my combo box’.
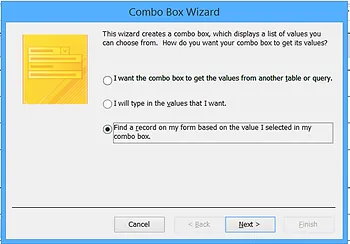
I then selected the key information that I want it to display, such as ‘FirstName’, ‘LastName’ and ‘CompanyName’.
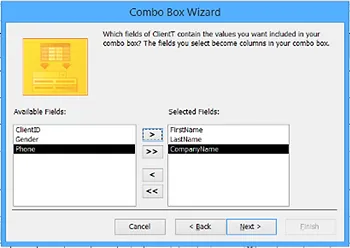
I gave it a name called ‘Find’ and I adjusted the combo box so it fits next to the buttons. Now, I can view all our clients In a list and if I click on one then it will take me straight to that client.

What I could also do is display it a little better by going into the property sheet and adding in extra code to the row source:
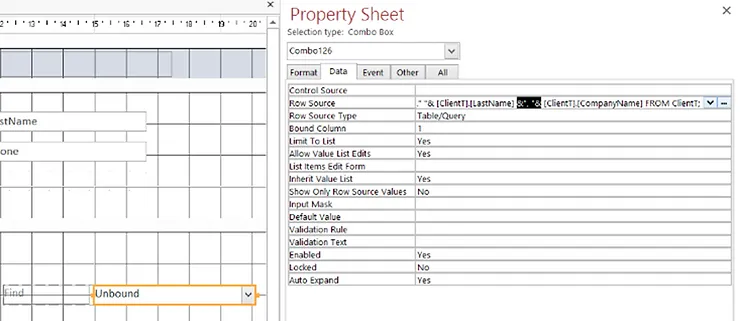
The row source is now:
SELECT [ClientT].[ClientID], [ClientT].[FirstName] &" "& [ClientT].[LastName] &", "& [ClientT].[CompanyName] FROM ClientT;
I then changed the column count from 4 to 2 and the list width from 7cm to 5 cm to make it display in one column that is smaller as we are using less columns.
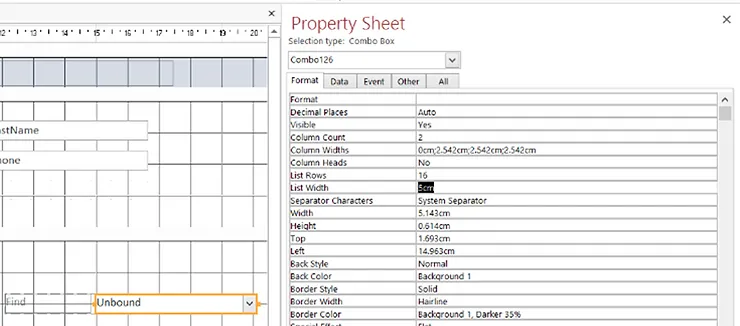
The end result looks like this:
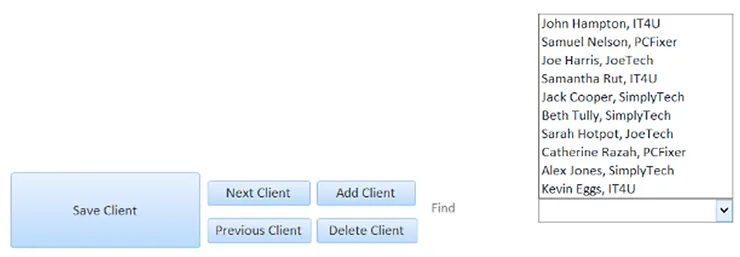
What i could do extra is to sort the combo box by name so it is even easier to find the client you are looking for.
Importing Data
Import data from an external source (M2)
I have a list of companies that are a part of our IT Support service in an excel spreadsheet. I have been told by my boss to import this data into our database under the table name ‘ClientCompanyT’.
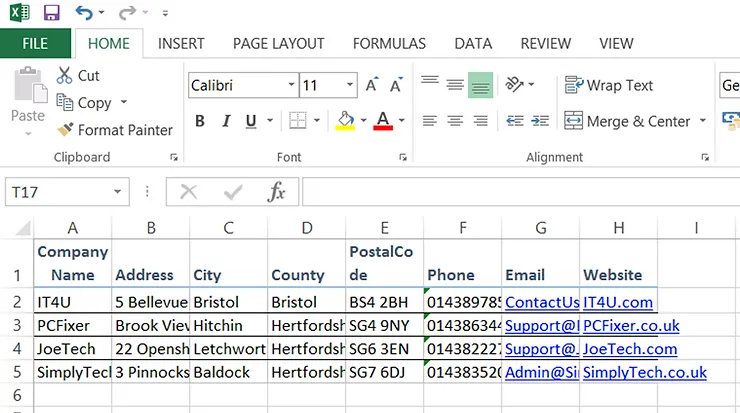
To do this, I would need to make the table ‘ClientCompanyT’ in the database with all the correct headings so that the headings in the database match the headings in the spreadsheet. I would then need to click ‘Import Excel Spreadsheet’ found under the ‘External Data’ tab at the top of the database document (before I click this, I need to close the ‘ClientCompanyT’ table or it will create an error message later).

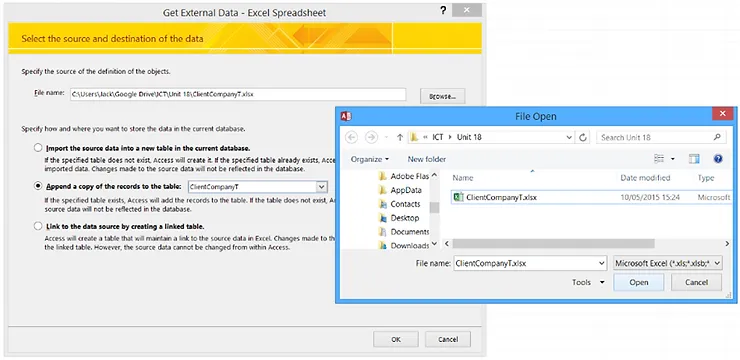
Once I closed the table, I then clicked the import button. I selected ‘Append a copy of the records to the table’ and I selected ‘ClientCompanyT’ from the combo box. I also browsed for the excel file that I need to import the data from.
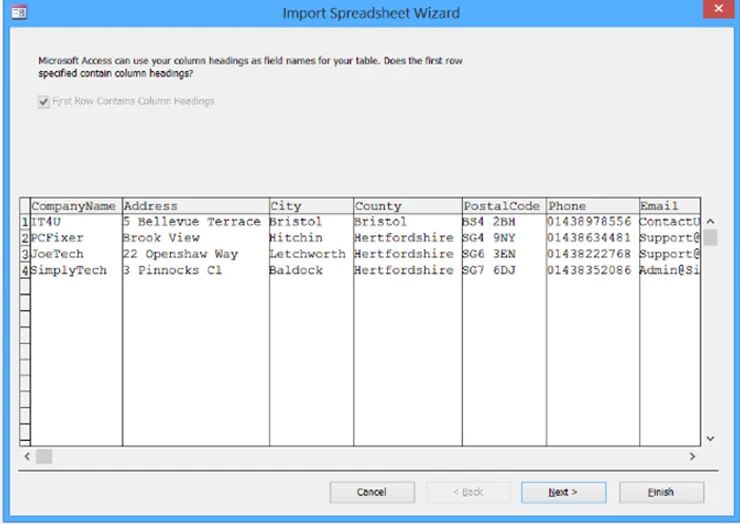
The data in the excel spreadsheet then gets converted into text where you can look at it to make sure it is correct before importing it to the database.

After clicking finish, it then imports all of the data from the excel spreadsheet into the database. This is the final result:
Exporting Data
Export data to an external source (M3)
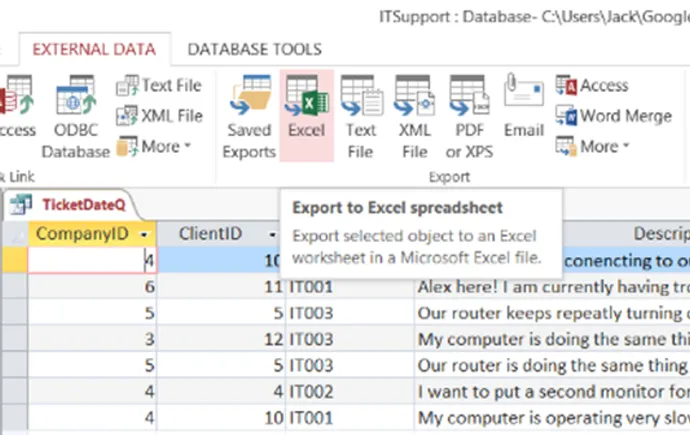
Back to the query where I wanted to find out all the tickets that has been created in the past 5 days. My boss wanted me to export this information to an excel spreadsheet. In order to do this, I would need to run the query again to get all the data:
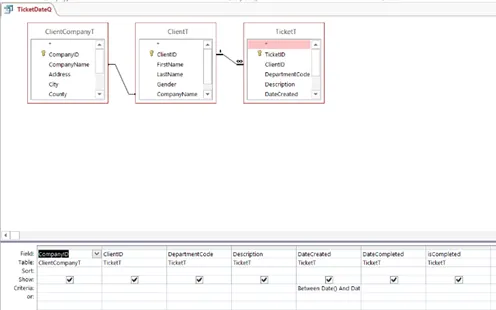

I have the data, now I need to click the ‘Export to Excel Spreadsheet’ button to export the database to an excel spreadsheet.
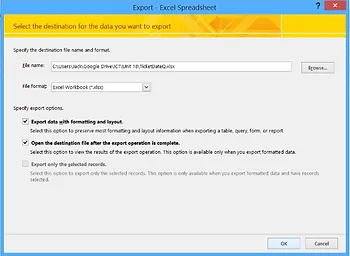
I then made a new excel file name called ‘TicketDateQ’ in the allocated file directory where I keep all my Unit 18 files. I also selected the file format which is the excel workbook format ‘.xlsx’. The first two boxes are ticked and then I clicked ‘ok’.
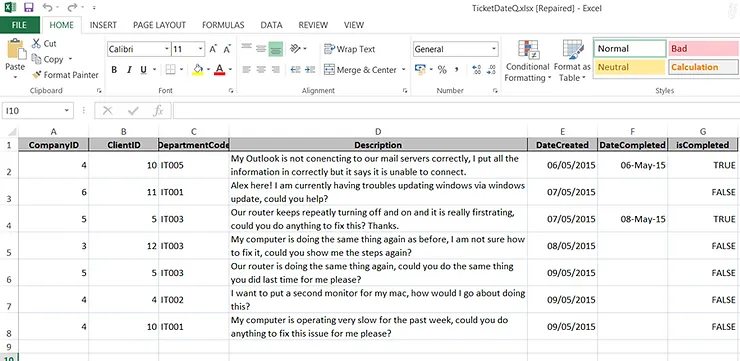
After clicking ‘ok’, it has opened up a excel spreadsheet with information on tickets in the past 5 days. Here is the final result:
Automation
Implement an automated function (M4)
I am going to make an automated function whereby when I click a button, it print-previews the whole report so I know what it will print before I click the print button.
To do this, I first need to create a report to implement the button on. I went into the ‘TicketT’ table where it shows the list of tickets made and I will turn this table into a report by clicking on ‘Report’ under the create tab at the top of the access document.

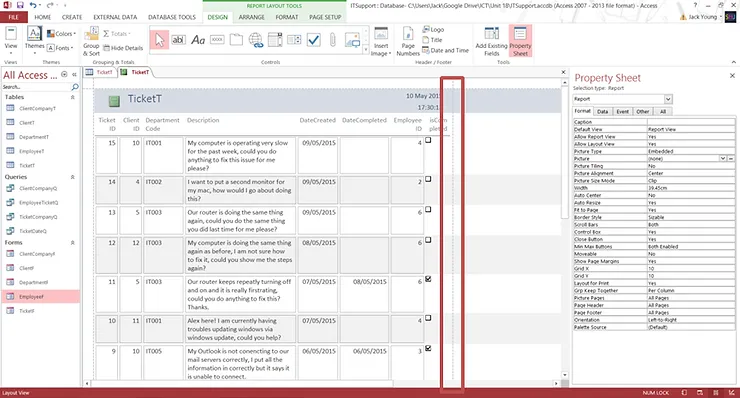
It comes up with something like this:
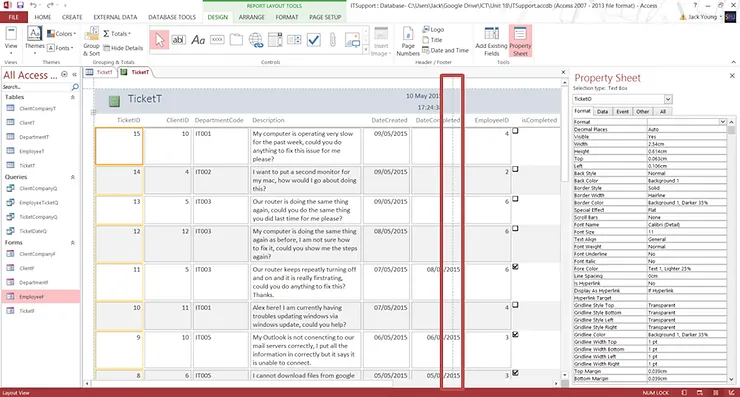
As you can see, this report does not fit A4 paper correctly (The size of A4 paper is marked by the red rectangle around the light grey striped line).
I shrunk all the boxes together so it nicely fits an A4 piece of paper if I so choose to print the ticket list.
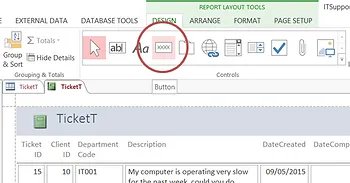
To make a button, I need to select it from the design tab at the top of the access document.
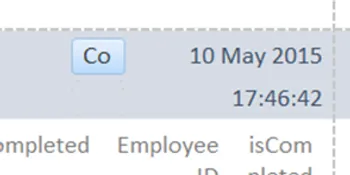
I then adjusted the button so it nicely fits in the report. I also called the button ‘PrintPreview’ as ‘Command43’ was not a good name for it.
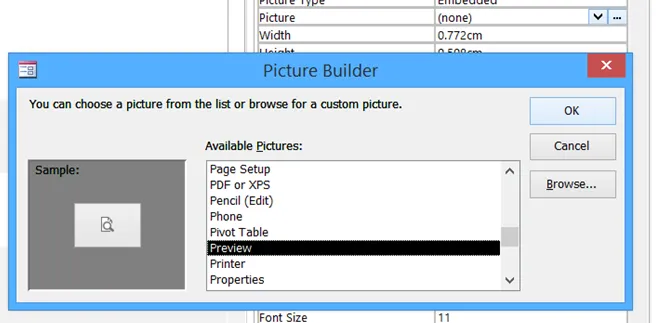
I also changed the button so it displays a picture instead of text that is squished together.
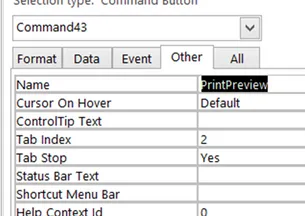
After this, I went into the property sheet, select the event tab and clicked on the ’…’ next to ‘On Click’. I selected ‘Macro Builder’ and then clicked ‘Ok’.
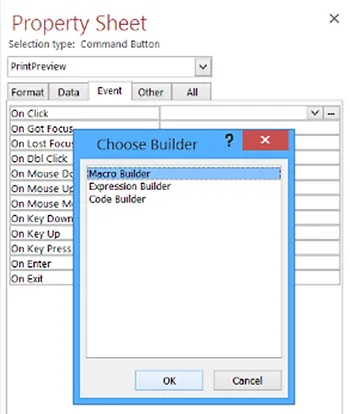
This then takes me to a new page where I input the name of a new action. I typed ‘OpenReport’ into this box.

The report name is the report I want to preview when I click the button, this is called ‘TicketT’. I changed the view from ‘Report’ to ‘Print Preview’. I clicked save and returned to the report.

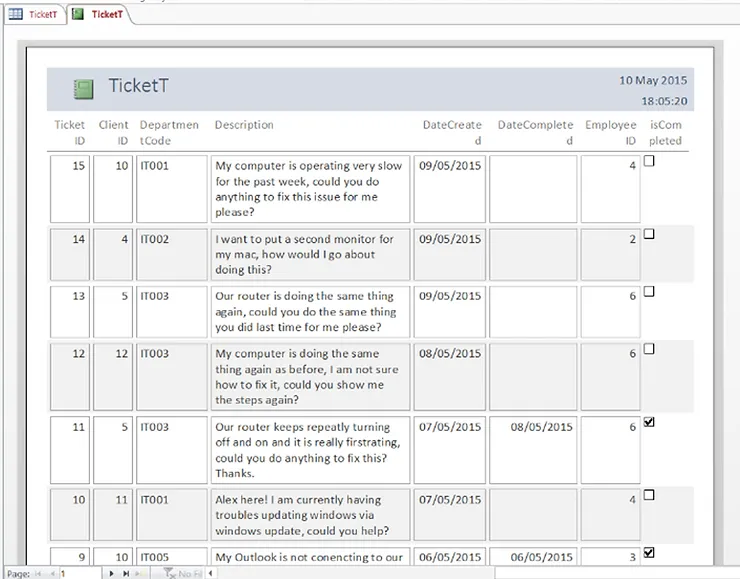
This is the report with the new button on it which is an automated function that goes into print preview mode.
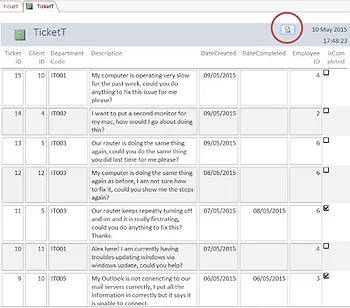
After the button is clicked, it takes me to a print preview screen. This report nicely fits A4 size, now it is ready to be printed.
